/*-------- Begin Drop Down Menu -------*/ #menubar { background: #8E8E8E; width: 840px; color: #FFF; margin: 0px; padding: 0; position: relative; border-top:1px solid #B2FFFF; height:35px; } #menus { margin: 0; padding: 0; } #menus ul { float: left; list-style: none; margin: 0; padding: 0; } #menus li { list-style: none; margin: 0; padding: 0; border-left:1px solid #1A6680; border-right:1px solid #1A6680; height:35px; } #menus li a, #menus li a:link, #menus li a:visited { color: #FFF; display: block; font:normal 12px Arial, Tahoma, Helvetica, FreeSans, sans-serif; margin: 0; padding: 9px 12px 10px 12px; text-decoration: none; } #menus li a:hover, #menus li a:active { background: #130000; /* Menu hover */ color: #FFF; display: block; text-decoration: none; margin: 0; padding: 9px 12px 10px 12px; } #menus li { float: left; padding: 0; } #menus li ul { z-index: 9999; position: absolute; left: -999em; height: auto; width: 160px; margin: 0; padding: 0; } #menus li ul a { width: 140px; } #menus li ul ul { margin: -25px 0 0 160px; } #menus li:hover ul ul, #menus li:hover ul ul ul, #menus li.sfhover ul ul, #menus li.sfhover ul ul ul { left: -999em; } #menus li:hover ul, #menus li li:hover ul, #menus li li li:hover ul, #menus li.sfhover ul, #menus li li.sfhover ul, #menus li li li.sfhover ul { left: auto; } #menus li:hover, #menus li.sfhover { position: static; } #menus li li a, #menus li li a:link, #menus li li a:visited { background: #B3B3B3; /* drop down background color */ width: 120px; color: #FFF; display: block; font:normal 12px Arial, Tahoma, Helvetica, FreeSans, sans-serif; margin: 0; padding: 9px 12px 10px 12px; text-decoration: none; z-index:9999; border-bottom:1px solid #1A6680; } #menus li li a:hover, #menusli li a:active { background: #130000; /* Drop down hover */ color: #FFF; display: block; margin: 0; padding: 9px 12px 10px 12px; text-decoration: none; } /*-------- End Drop Down Menu -------*/

Friday, 30 September 2016

Exploring Bugs


Over the past few weeks we have been exploring bugs!  The children are both fascinated and scared by them; with Wugs declaring his undying for spiders until he sees one and then runs through the house screaming and with Dooey saying he doesn’t like flies, but if he sees one sat on a table or flower he watches it with fascination.  Either way, I thought devoting a few weeks to the study of bugs would be therapeutic for them…and me! (It’s ironic that I’m writing this a week after a gigantic spider crawled under my bed which meant I had to bunk with the children all night)!

Bug Sensory Tub


I started off our bug exploration with a sensory tub which I filled with soil, a spoon, a flower or two, some fruit on a plate with a bug munching on it (the children are intrigued by bugs turning up on plates or in food after we played the “Pizza! Pizza!” game from Orchard).  They played with the sensory tub on and off for a couple of hours and at one point when I was sitting inside I could hear them through the window talking about the need for the caterpillar to eat lots and lots of food referencing Eric Carle’s The Hungry Caterpillar.   

A Bug Hunt


Afterwards I asked the children if they would like to look for bugs in the garden.  We had a look through some cards that showed illustrations of common bugs and that matched the models of the bugs they had been playing with. 


The children took the bug box and a magnifying glass into the garden and spent all afternoon outside searching for bugs.  To their delight, they discovered a caterpillar on the wooden fence and gently put him in the bug box with a leaf.  He instantly coiled up and after 15 minutes still hadn’t uncoiled, so Dooey released him. They also found lots of ants and a spider which we placed in the box, but it turned out to be dead already.


For added fun I included some bug glasses, so the children could see through the eyes of a fly!  (I’m not sure how accurate the bug glasses are, but they had great fun putting them on and seeing the world through yellow-tinted glasses).


Alongside our outdoor activities, I included some literacy and maths activities which I placed on the children’s shelves indoors.  These were downloaded from TrilliumMontessori.

Counting Ladybirds and Spiders
The ladybird counters were made using red glass pebbles and a black marker; an idea I took from Trillium Montessori.  As our red pebbles were quite dark, we carried out the counting on our DIY light box, which the children are always thrilled to use.  I adapted this idea for my spider-lover using clear pebbles. 

Pegging the First Letter Sound


For the literacy activities we used the cards to peg the beginning letter sound using some ladybird pegs. 

Bug Identification (Nomenclature) Cards


I also included some terminology (nomenclature cards) which we downloaded from Every Star is Different.  I spent some time searching for some clear, real images and I found that these were the best.  The children became familiar with the names of various bugs and then matched the labels with the pictures. 


Creating an Ant Farm

Although the children enjoyed all the activities, they seemed to prefer observing the live bugs they had seen in the garden, but when the children came close, the insects would freeze in fear.  I thought creating a habitat for the bugs and observing them over a period of time would give the children an opportunity to view their habits without frightening them.  So... I invested in an ant farm!  Our ant farm arrived a few weeks ago.  We went into the garden to collect the ants in the little dish provided, but we waited and waited and couldn’t find any ants at all!  I could see the children’s interest waning, so I decided to order some ants online. 


Week 2
Week 5
The ants arrived in a dish with soil already provided and we connected it up to our farm.  Slowly we saw the ants moving up the tube into the viewing box that was filled with a sand/soil mixture.  Unfortunately, most of them stayed in the tube or seemed happier in the dish with the soil they had travelled with, so after a couple of days I engaged in the tricky operation of emptying the soil and some of the ants directly into the farm. I had a couple of escapees, but on the whole it was a success!   Over the past week the ants have begun to create tunnels and chambers in the sand/soil, carrying things from one area of the ant farm to another.  We replenish their food every few days and keep the soil moisturised using a teat pipette.  So far we haven’t observed any pregnant ants, but we are on the look-out!

Ant Anatomy


Seeing as the children are observing ants at the moment, I thought it would be useful to look at the anatomy of an ant.  These sheets are produced by Gift of Curiosity and are free to download.  A control sheet is also provided.

Bug Books

During our bug project, we visited the library and collected a number of books and pulled out a few of our favourites from our own collection.


A new series that we are starting to collect is produced by Moonlight Publishing and uses overlays and a “torchlight” (a white backdrop in the shape of a torch!) to view detailed images.  Given that Dooey is still in his sensitive period for small things, I found these books have really captured his interest.


At the moment, the National Geographic are doing a series on bugs and each edition has a specimen of a  bug enclosed in glass.  (I hope they died naturally).  The series looks amazing, but is a bit expensive, so we might be selective about which ones we collect.  The features and images on the National Geographic website are a great alternative and include lots of interesting facts.

Clay Bug Creations


Our final bug activity involved creating bugs from clay, pipe cleaners and googly eyes.  We had 12-legged spiders and insects with just one eye!
I'm not sure if our bug activities have completely allayed our fear of creepy crawlies, but the children seem to have a greater appreciation for them.  During a trip to a playground, Dooey discovered a golden-coloured caterpillar and on the trunk of a tree at Wugs' school, he found a yellow ladybird.  We try to take pictures of our little discoveries each time we meet them.

Friday, 25 March 2016

Resurrection Garden


I love Easter!  I love it like most people love Christmas!  The promise of new life reflected in the season with its blooming of daffodils and the lighter evenings after the cold and darkness of winter.

I felt inspired to create a resurrection garden a couple of years ago, initially building one from play dough, but this year I finally built up enough courage to grow one!  Given my poor performance in keeping plants and flowers alive, this was quite a feat.

It turned out to be very easy.  I purchased a large plant tray, a small flower pot, some soil and grass seed.  I covered the tray with soil and built a mound of soil over the flower pot.  Once the pot was held in place, I added grass seed pushing it into the soil.  I watered it and waited about six days for signs of life and by the sixth day grass started to sprout and from then on grew very quickly.  I added some stones that I collected from our driveway and a large stone for the tomb.


I wanted the children to open an egg each day and find a symbol of Easter inside that could be built into the garden scene.  I used seven plastic eggs and placed a chocolate for each child inside together with a symbol and a card.  The cards were downloaded from this website.  The website uses more cards as part of a resurrection egg activity, but I stuck with just seven days.  I hung the eggs on a tree for the children to take down and open up each day.


In addition to the symbols I included some larger items: a donkey, three crosses, an angel and a small LED light that will shine out of the tomb on Easter morning (more photos to follow).


The children absolutely loved it and we accompanied the activity with readings from the bible story to make sure the children could appreciate the true meaning of Easter.

What we used:
Large plant tray
Soil
Grass seed
Small plant pot
Small stones
One large stone
Plastic eggs
Symbols for the eggs: green foam paper palm leaves, bread, a foil cup to symbolise suffering, a gold coin, a crown of thorns made from twisted jewellery wire, a crucifix, a swab to represent Jesus' clothes in the tomb (I decided that the "clothes" would be placed in the tomb for the children to discover on Easter morning, rather than in the egg).
A donkey figurine
An angel (made from silver tinsel pipe cleaners)
3 crosses (made from coloured lollipop sticks)


Happy Easter everyone!

Friday, 5 February 2016

Chinese New Year Activities and Crafts


More Chinese New Year activities and crafts:


Chinese New Year Small World Play

Lion Dance Puppets

Chinese New Year Sensory Tub


My youngest son, Dooey (2.7 years) is really into sensory play at the moment, so I created this mini sensory tub for him to explore.

What we used:
Rice (dyed red)
Gold coins
Orange peel
Angpow packets (for him to transfer the rice into and empty)
Tin containers (for extra sound)
Scoops for transferring
(Another idea I had, but didn't use in this tub was the idea of adding the 12 animals of the Chinese zodiac for the child to discover and arrange according to the order they came in the race).

Orange Peel Numbers


This activity was based on the lion dance that is performed around shops and condos in Singapore during the build up to Chinese New Year.  During the dance, the lion is offered oranges (believed to symbolise prosperity and health), which he consumes, leaving an arrangement of "lucky" numbers which he forms out of the orange peel.   The Chinese typically make a note of the numbers and then gamble on them!

I created an outline of our numbers (I followed the year, 2016, but also created individual mats for the boys birth years, 2011 and 2013).  I peeled a couple of oranges and tore up the peel.  The boys then arranged the peel in the shape of the numbers.  It was also a fun way to teach them the year of their birth and to help Dooey (2.7 years) gain a familiarity with the shape of the numbers.


What we used:
Paper
Printer
Laminator
Orange Peel
Bowl

Chinese New Year Plaques


When I think of Chinese New Year in Singapore I think of red and gold plaques with animals and/or Chinese symbols for wealth, health, good luck and happiness stuck to shop windows or hanging from the ceilings - if not the plaques then those gigantic paper pineapples!

Today we made some plaques of our own - an activity that combined writing and threading skills.

I downloaded images of Chinese symbols for happiness and laminated them.  I gave each child a symbol, tracing paper and a black marker pen (Dooey chose green!) and let them trace the symbol. Later we mounted the symbols onto red card and added some gold thread, which Wugs threaded.
What we used:
Chinese symbol (laminated)
Tracing paper (optional, the child could copy)
Glue
Red card
Gold thread

Making Angpow Packets


We have really been getting into the spirit of Chinese New Year this week and decided that today we would make some angpow packets.  In Chinese tradition, the red envelopes (sometimes refered to as "lai see") are usually filled with money notes and presented by the older generation to the younger one.  They symbolise good luck for the year ahead.   Being a part-Chinese family, we follow this tradition and the children will be receiving angpow from us and their grandparents this year.

I designed a template for the packets based on an A4 sheet of red paper.  Once I had cut them out and glued the edges, I presented the packets to the boys for decoration.  Usually the decoration is in gold and includes Chinese symbols for good luck and happiness.  Once they had finished, we added chocolate gold coins.


What we used:
Red A4 paper
Glue
Gold and red glitter glue
Examples of angpow packets and Chinese symbols
(Any red and gold patterned paper would also look good on these packets).
Chocolate gold coins

Counting Angpow


I'm always looking to present maths to my sons in fun and interesting ways.  (I loathed the subject as a child!).  In these activities I used their fascination with money and their anticipation of receiving their angpow this Chinese New Year to encourage them to practise counting, adding and subtracting.

The first version of this activity was made for Dooey (2.7 years).  I gathered together 5 angpow packets and fixed 5 post stick notes to the back with numbers on them.  I did the same to the front of the packets, but instead of writing the numbers, I made dots to correspond to the numbers on the back.  Then I flipped them over so the numbers were facing him.  For each number he read out, he counted the same in coins and placed them inside the packet.  Once he was finished, he flipped over the packet and emptied it, comparing the number of coins he placed in the packet with the number of dots on the front.  (The post sticks notes with dots worked as a control of error).


The second version of this activity was made for Wugs (4.3 years).  Instead of writing numbers on the back of the packets, I wrote sums which corresponded to the answers on the front of the packet:


This activity combined their love of coins with their love of hiding and rediscovering objects in envelopes.


What we used:
Angpow packets
Post stick notes
Black marker pen
Coins

Monday, 1 February 2016

Lo Hei - Chinese New Year craft


"Lo Hei" or "Yusheng" is a traditional Chinese New Year meal for the Chinese in Malaysia, Indonesia and Singapore.  It consists of a raw fish salad, shredded vegetables and condiments with each ingredient symbolising some aspect of good fortune for the year ahead.    The meal is served on a dish and is tossed in the air using chopsticks with the idea that the higher it is tossed the greater will be the group's fortune in the year ahead.

I thought it would be fun for the children to create a "Lo Hei" dish using various craft supplies I had around the house.  Getting the children to cut up the "ingredients" is a fun way to strengthen their fine motor skills, especially if they are going through a phase of wanting to cut everything!


I gave my son a plastic plate, some glue, a paintbrush and a large plate of the "ingredients".  He brushed the glue on the base of the plate and gradually added the "food", adding glue to different levels of the dish so it would hold together. The more glue that is added to this craft, the more realistic it looks.  The inspiration for this idea came from  CBeebies Mister Maker who has made some amazing food crafts and has a clever technique for gluing spaghetti that could be applied to noodles.  Once his dish had dried, and the chopsticks added we could hang it up as a picture.


A fun extension to this activity would be to see if the children can toss the ingredients using chopsticks.


What we used:
String
Yellow wool
Red crepe paper
Orange foam paper
Green tissue paper and foam paper
Wooden chopsticks

Wednesday, 30 December 2015

Christmas Counting Activity


My two-year old is massively into playdough at the moment and his older brother is interested in counting, so I created this activity with both of their interests in mind.

The Christmas tree is made of playdough, which I rolled out and then cut into shape using a cookie cutter.  In one bowl I placed some numbers and in the other a handful of sequins.  I demonstrated the activity to the children, selecting a number from the bowl and placing it above the tree and then counting out the sequins to match the number above the tree.  Wugs (4) did this a few times on his own, the largest number he created was 30 before screwing up the Christmas tree and playing with it to create various shapes.  Dooey (2) didn't engage with the numbers, but enjoyed pressing the sequins into the playdough and then pulling them out again.

An easy activity to set up and engaged the boys for some time - we've pulled it out numerous times over the Christmas holidays!

What we used:
- Green Playdough
- Cookie Cutter
- Plastic Numbers
- Sequins


Tuesday, 29 December 2015

Gold, Frankincense and Myrrh Activity


This year we brought the nativity story alive by experiencing the gifts that the wise men brought the baby Jesus.  As a child I remember wondering what the gifts of frankincense and myrrh were like and this year, I ordered a bottle of the oils.  I emptied a drop or two of each oil onto a cotton wool ball and placed the cotton wool balls into these beautifully crafted pill boxes from India.  In the third box, I added a little gold cross.

Once the children had smelled the frankincense and myrrh, I added one of the oils to a burner to see whether they could guess which oil was burning.  This was quite difficult as frankincense and myrrh do not smell that different.  Frankincense was, in my view, a slightly heavier smell than myrrh.


What we used:
- Essential oils of frankincense and myrrh
- Gold cross
- Small pill boxes
- Small tray
- Oil burner

Advent Calendar Maths Game


This Christmas we found ourselves in the awkward position of having three advent calendars and just two children to open them. The generous act of a mum at Wugs' preschool of giving each child an advent calendar meant that I had to decide whether to consume the chocolates in the third advent calendar myself or ask the children to take turns in having the chocolates in addition to the ones they had from their own calendars. Given the huge amount of chocolate that is generally consumed at Christmas, I thought I'd do something different with this advent calendar.

I decided to create a treasure hunt where the clues behind each door of the calendar are Maths puzzles, which lead to the next door and so on.

To make this game, I emptied all the chocolates from the advent calendar and put them in a bowl in the fridge. Then I measured the inner doors of the advent calendar and created 24 paper squares which would cover the picture that was already on the inner door. On the squares I wrote the puzzles. I used four different types of puzzle:
- subtraction (e.g. 5-3)
- addition (e.g. 10+3)
- counting (e.g. pictures of trees or snowballs)
- sequences (e.g. 62, 63, 64, 65, __?)


Once I wrote out all the puzzles on the paper squares, I cut out 24 small stickers and wrote the answers to the puzzles on them.  The only sticker that is not the answer to a puzzle is the first and I labelled this 100 as Wugs is interested in that number at the moment. I stuck the stickers over the numbers on the advent calendar doors and then starting with door 100, I stuck the puzzles to the inside of the calendar doors. The answer to the first puzzle is the number of the next door to be opened. For example, door 100 has the puzzle "Count the stars" followed by a drawing of 9 stars. The child then opens the door with 9 on it to reveal another puzzle and so on until all the doors are opened. The last door says a simple "well done!". If any doors remain closed then an error will have been made along the way and the child might wish to go back and double-check his/her answers.

Once I finished making the calendar, I added a chocolate to a couple of the doors, so that Wugs gets a surprise every now and then as he works through it. The second time he does it, a different door will have the chocolate and so on.

My Advent Calendar Maths Game was created for a four year old, with the puzzles ranging from very easy to difficult and I offered Wugs a hundred board and 20 stones to help him with the addition and subtraction puzzles.  The game could be adapted for any age range.

What we used:

- Advent calendar (with/without chocolates)
- White paper
- Stickers
- Pen
- A hundred board and 20 stones

Tuesday, 1 December 2015

Prayer Advent Calendar


For the last couple of years I have created advent calendars which contain a craft or activity to do with the children.  This year I decided to go for something a little different...

 I've often thought that the greatest thing I could teach my children is how to pray.  To be able to show them how they can speak to God, to share their happiness and their troubles with Him is really a gift that can be taken for granted.  Our advent calendar this year will contain a heart in each pocket which represents a person or a country that we will pray for on that day.  Hopefully we will do this with our Advent Candle lit and blow the candle out after we have prayed.

In putting together the advent calendar I asked the boys who they would like to pray for and then I added some of my own.


I'm hoping that throughout advent the boys will begin to lead us in prayer and grow spiritually.

In our church the children are asked if they would like to pray for the children's ministry and a child always offers to come out the front and say the prayer.  Not only does it encourage children to talk to God, but also it acknowledges that children are equally important to God and to the church and enables them to gain confidence in public speaking.

Monday, 30 November 2015

Advent Candle


Yesterday my son created this beautiful advent candle during his children's church session and the idea was simply too good not to share!

To create the base of the advent candle, a paper plate was provided together with a text "Jesus is Coming" and a ring of 24 candles to encircle the candle.  We glued the centrepiece to the paper plate first and then my son chose from a variety of small decorative materials to be added to his base.  He glued this around the centrepiece. The candle was the last piece to be added which was glued inside the ring of stars.  Each day of advent he will colour in one of the stars until the ring is coloured in and it is Christmas.  A simple and beautiful craft that could be easily put together as a last-minute Advent activity!


What we used:
Paper plate
Small decorative embellishments
A candle
A centrepiece with the words "Jesus is Coming" and 24 stars to encircle the candle (I do not have the printable, but it would be easy to recreate the text with a different wording (if preferred) and instead of using stars to colour in, the child could use star stickers to add to the centrepiece.
Glue

Wednesday, 25 November 2015

Autumn Play Dough


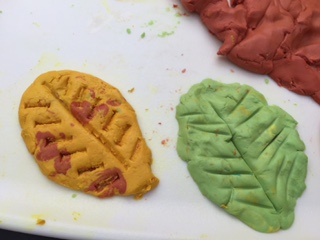
Today I experimented with a different type of play dough, “bubble dough” made from cornflour and hair conditioner.  Last February we experimented with a variation of bubble dough using cornflour and hand wash in our “Frozen” bubble dough play.  It gave a soft, but crumbly texture compared to regular play dough.  Our bubble dough this time was shiny, soft, a little bit slimy (like bubble gum) and eventually it became crumbly.  As we have been exploring Autumn this month, I decided to dye the dough to reflect the colours of the season. 

I poured the cornflour into a bowl and gradually added the hair conditioner, kneading each part until it was completely mixed together.  Then I added the food colouring.  This part was a little tricky as the hair conditioner was a pink colour, so I had to vary the quantity of food colouring I added to each batch of dough to get the desired colour.
I presented the dough to the boys and together we made Autumn leaves.  Unlike other play dough projects, it didn’t matter if the different colours became mixed up as it made the Autumn leaves look more realistic.

What we used:
1 part hair conditioner
2 parts cornflour
Food colouring


Saturday, 31 October 2015

Autumn Scavenger Hunt


This week we went on an Autumn Scavenger Hunt.  Wugs’ preschool presented him with a piece of paper with a variety of items on it that he could find on his walk.  The scavenger hunt was part of an initiative to raise funds to purchase more Montessori materials at the preschool.  For each item the child would be sponsored a certain amount.   The list ranged from basic things that could be found in the garden like a blade of grass and a stone, to items that are more difficult to find such as a winged seed.  This was a lovely way to encourage the children to appreciate nature during Autumn and raise some funds for the preschool.