/*-------- Begin Drop Down Menu -------*/ #menubar { background: #8E8E8E; width: 840px; color: #FFF; margin: 0px; padding: 0; position: relative; border-top:1px solid #B2FFFF; height:35px; } #menus { margin: 0; padding: 0; } #menus ul { float: left; list-style: none; margin: 0; padding: 0; } #menus li { list-style: none; margin: 0; padding: 0; border-left:1px solid #1A6680; border-right:1px solid #1A6680; height:35px; } #menus li a, #menus li a:link, #menus li a:visited { color: #FFF; display: block; font:normal 12px Arial, Tahoma, Helvetica, FreeSans, sans-serif; margin: 0; padding: 9px 12px 10px 12px; text-decoration: none; } #menus li a:hover, #menus li a:active { background: #130000; /* Menu hover */ color: #FFF; display: block; text-decoration: none; margin: 0; padding: 9px 12px 10px 12px; } #menus li { float: left; padding: 0; } #menus li ul { z-index: 9999; position: absolute; left: -999em; height: auto; width: 160px; margin: 0; padding: 0; } #menus li ul a { width: 140px; } #menus li ul ul { margin: -25px 0 0 160px; } #menus li:hover ul ul, #menus li:hover ul ul ul, #menus li.sfhover ul ul, #menus li.sfhover ul ul ul { left: -999em; } #menus li:hover ul, #menus li li:hover ul, #menus li li li:hover ul, #menus li.sfhover ul, #menus li li.sfhover ul, #menus li li li.sfhover ul { left: auto; } #menus li:hover, #menus li.sfhover { position: static; } #menus li li a, #menus li li a:link, #menus li li a:visited { background: #B3B3B3; /* drop down background color */ width: 120px; color: #FFF; display: block; font:normal 12px Arial, Tahoma, Helvetica, FreeSans, sans-serif; margin: 0; padding: 9px 12px 10px 12px; text-decoration: none; z-index:9999; border-bottom:1px solid #1A6680; } #menus li li a:hover, #menusli li a:active { background: #130000; /* Drop down hover */ color: #FFF; display: block; margin: 0; padding: 9px 12px 10px 12px; text-decoration: none; } /*-------- End Drop Down Menu -------*/
Showing posts with label toddler. Show all posts

Saturday, 31 October 2015

Autumn Scavenger Hunt


This week we went on an Autumn Scavenger Hunt.  Wugs’ preschool presented him with a piece of paper with a variety of items on it that he could find on his walk.  The scavenger hunt was part of an initiative to raise funds to purchase more Montessori materials at the preschool.  For each item the child would be sponsored a certain amount.   The list ranged from basic things that could be found in the garden like a blade of grass and a stone, to items that are more difficult to find such as a winged seed.  This was a lovely way to encourage the children to appreciate nature during Autumn and raise some funds for the preschool.


Sunday, 25 October 2015

Colour-Matching Drop Box


This September I started training to become a Montessori-qualified teacher.  It’s been busy studying with a pre-schooler and a toddler at home, but I’m hoping the course will help me to facilitate my children’s learning and to enable me to share our experiences on here with you.

The inspiration to create drop boxes came from an attempt to apply the principle of “control of error” to the children’s activities.  Control of error refers to a mechanism whereby a child can perceive his/her own mistake when undertaking an activity because the activity is designed according to the principle of one-to-one correspondence.  A typical example of this would be a jigsaw puzzle in which every piece is different and only interlocks with the correct corresponding piece.  

The first drop box I created was for my 2.5 year old who has developed an interest in colours (or at least the names of colours).  He would point to a red car and say “I want the green car” and this would lead to some frustration on his part and confusion on ours.  Rather than correcting him each time, I thought it would be more effective for him to realise his mistake through a self-checking element incorporated into the drop box. 


I purchased a sturdy box from Hobbycraft and cut some windows into the lid.  Around the edge of each window I created a border using eight different-coloured marker pens to correspond to the different-coloured pom poms to be posted into the windows.  One of the pom poms was multi-coloured, so I represented this with a multi-coloured border.  (I added the names of the colours above each window so that my 3 year old could also use the box and become familiar with the words that correspond to the colours).  Inside the box across the base, I made coloured circles to correspond to the coloured edges of the windows, so that when my son posted the pom poms into the box, he could remove the lid and check whether he had posted the pom poms into the correct window.  To make the self-checking element more pronounced, I could have created sections inside the box (as I did with the letter-matching box), but as I used only a few pom poms in this activity, they tended to fall exactly on the coloured circles, making it obvious which window they had been posted into.  The decision to use just a few pom poms worked well as I found my son’s concentration was beginning to wane as he came to the end of the activity.

The drop box managed to grip my son’s attention and after six or seven attempts over the course of a couple of weeks, he was able to match the pom poms correctly and refer to the colours of objects in the room accurately. 


What we used:
  • A sturdy cardboard box (a shoebox would have worked well provided the coloured borders were not obscured by writing/patterns)
  • A craft knife
  • Marker pens
  • Coloured pom poms
Click here to see our letter-matching drop box


Sunday, 3 May 2015

Botany Montessori-Inspired Activities


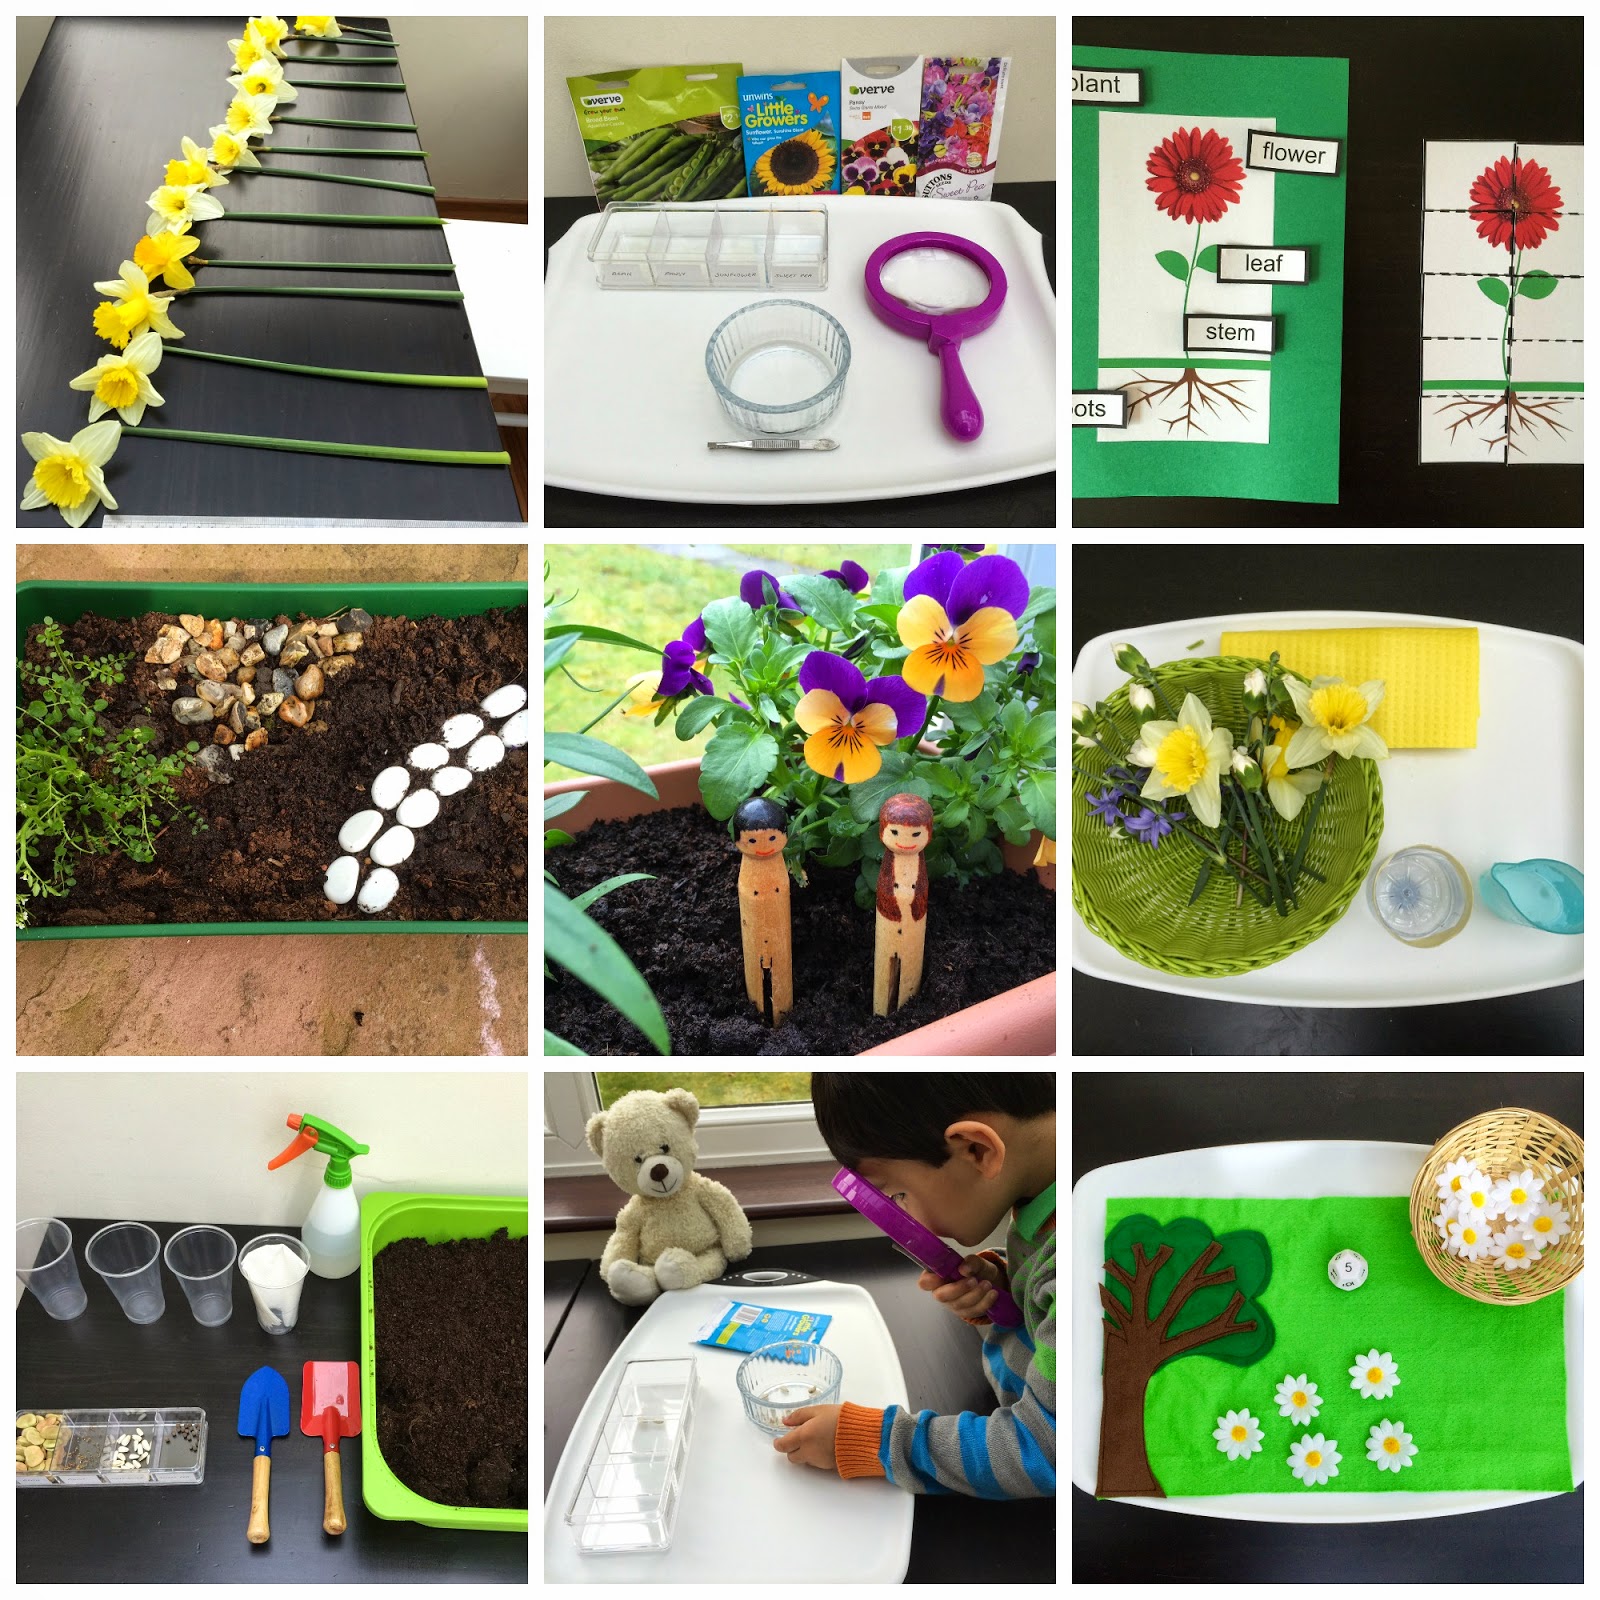
This month we have been celebrating the arrival of spring with lots of flowers.  Both boys love flowers and their interest in them led me to create the activities below.  For more details about each activity, please click on the sub-headings.  (We still have a few more planned so I will be adding to this page):

This activity was all about exploring the texture, patterns and size of seeds as well as understanding how a seed develops into a plant.

The seed planting exercise was so popular that we decided to conduct an experiment based on The Parable of the Sower.  We planted seeds on rocky ground, among weeds, on a path and in good soil to observe how the environment in which a seed is planted effects the plant's growth.

This is a classic Montessori exercise, but one which we haven't tried before.  This was an activity that both my toddler and pre-schooler were able to do.

The sensory tub was an opportunity to explore the different textures, smells and colours of the garden.  This tub was enjoyed by my toddler, Dooey.

Alongside learning about spring, we have been reading the creation story and decided to plant our very own Garden of Eden with our resident (for now!) Adam and Eve.  It is a garden that my sons water and take care of.  

Learning to identify the names given to parts of a plant.

My way of sneaking in a bit of maths!


Garden Sensory Tub


The other week I put together a Garden Sensory Tub for my toddler who loves exploring different textures and who is particularly fascinated with the things he finds in the garden at the moment. Sadly, I am usually taking those things away from him (conscious that some plants are poisonous and my toddler has a tendency to put everything in his mouth!).

One afternoon, I went out in the garden and gathered various things that I thought would be of interest to him or that he has shown interest in: flowers, leaves, a feather, pine cones and bird seed.  I gave him some containers and scoops as well in case he wanted to transfer the items in and out of the tub.

The sensory tub turned out to be a great way to let Dooey safely explore the things he finds in the garden - with me standing just feet away from him, ready to intervene if necessary - and to ensure he washed his hands afterwards.


What we used:
Tub
Leaves, flowers, bird seed, feather, pine cones
Scoops and containers

Please note if you are following this activity, be aware that some plants are poisonous.

Please click here for more Botany-related activities:


Flower-Arranging


The arrival of spring is usually announced in this country with the blooming of daffodils everywhere and I have really missed it.  For us, the added surprise has been discovering the different types of plants that have appeared in our garden.  (We have been living abroad for four years and moved into our current house last November, so we haven't yet seen the garden through all the seasons).  The boys have been learning to spot the daffodils and crocuses on our various walks around the neighbourhood.  Today I gave them an opportunity to pick them and arrange them.


I gave Wugs a basket and some scissors and let him cut the flowers he wished to arrange.  He needed some instruction on cutting the stem as far away from the flower as he could (otherwise the flowers wouldn't fit into the vase).  This would have been an easier activity if I had given him smaller scissors!!


When he had finished he laid out the daffodils on the table and we compared the length of the stems of the daffodils he had cut using a ruler to help him understand that the stem length and the vase size were important.  I set up a tray with a jug of water, a cloth for spills and a vase and he began arranging the flowers, keeping aside the ones that had shorter stems and didn't fit into the vase.  I offered him some white carnations that I had in the kitchen to add to his display.


I wasn't quite sure what to do with the flowers that had shorter stems as I didn't have a small vase, so I made one using the bottom of a water bottle and decided to let Dooey in on the action when he woke up.  I envisaged water everywhere and my toddler with a mouthful of daffodil petals, but he took to the activity very well.


What we used:
Basket
Flowers
Scissors
Jug of Water
Vase
Cloth


Please click here for more Botany-related activities:


Tuesday, 21 April 2015

Helping My Child Overcome Anxiety About Starting School


Starting school can be an especially anxious time for both a child and parent, whether it's starting preschool for just a few hours each week or going to a primary school for five days a week, the transition involves a physical separation of the parent and child and all the emotions that go with it. For us. the transition has been particularly painful.  For the three years of my son's life, he and I have been practically inseparable.  (We lived in Singapore without any close family nearby to babysit and with our impending move, we decided not to enrol him in a preschool there).  Almost everything we experienced in those three years, we experienced together.  Suddenly, I was bundling him up in jacket and backpack, walking him down the road to a building where I kissed him goodbye and left him in the hands of complete strangers.

In reality, the separation wasn't quite that dramatic.  Initially I sat in on the sessions until I felt he was adequately settled.

It was then that the backlash began ...

My (usually) non-aggressive child was kicking and hitting his brother, he would sit on the stairs before preschool refusing to go, he would try to dodge the teacher to follow me out of the building, any mention of the word "preschool" would involve tears or a torrent of hate-speech: "I want to hit preschool", "I want to huff and puff and blow the preschool down!!" (I suspect they read him the story about "The Three Little Pigs" there) or more recently "I want to throw the preschool into the toilet and flush it away!" Whilst the preschool assured me that beyond the initial upset of saying goodbye, he was peacefully engaged in all the activities there, I started to feel the whole experience was damaging our relationship, that the unquestionable trust that a child has in his parent to listen to him, to take his feelings seriously and to make him feel safe was being eroded.  I was on the brink of pulling him out...


Books
Before abandoning school entirely, I decided to do some work on helping my son talk about his feelings. I started by ordering some books about feelings and separation and then followed up this reading with some play therapy and created a "Peace Corner" in the children's bedroom.

Two books that have helped us immensely are:  The Way I Feel and The Kissing Hand.

The Way I Feel by Janan Cain is a book that illustrates children displaying an array of different feelings: silly, scared, disappointed, happy, sad, angry, thankful, frustrated, shy, bored, excited, jealous and proud. The pictures are accompanied by a rhyming text that helps to describe the emotion in more detail: for example the emotion "Frustrated" depicts a girl trying to tie her shoelaces with the accompanying text: "I'm frustrated because I can't do it.  It's hard and I want to cry.  I don't know whether to give it up or to give it another try."  My children love the illustrations in this book, which not only show realistic images of children displaying emotions, but also reflect that emotion in the surrounding illustrations on the page.  The boy who is sad and sitting in a tree is surrounded by drooping leaves of blue and green that invite the reader into his world of sadness.  (The illustrations are so effective that my 23 month old, Dooey, looks at it and starts to talk in a sad voice too, before taking the book in his hands and kissing the page to make the boy feel better).

The Kissing Hand by Audrey Penn is a heart-warming book about a raccoon called Chester who feels anxious about starting school until his mother shares with him the secret about "the kissing hand". His mother unfolds the fingers of Chester's hand and kisses the palm, telling him that if he feels lonely and misses her, he should lift his hand to his cheek and instantly he will be filled with his mother's love and warm thoughts.  The story has a beautiful ending where Chester looks towards his school and then unfolds his mother's hand and kisses it before running off.  The book wonderfully acknowledges that the separation is painful for both the parent and the child. This story had a profound effect on my son who was about to enter the preschool gates a couple of weeks ago, when he lifted his hand to his cheek and smiled at me.

Somehow spending each evening with Wugs on my lap for 10-15 minutes, reading him these books, helping him to identify circumstances that cause him to feel angry, sad, frustrated or jealous and then talking through how to handle those emotions has resolved the aggressive behaviour and made him more vocal in describing his feelings rather than simply acting on them.  "Preschool" is still a bad word in our house and with last week being the beginning of a new term after the Easter break, I was concerned his anxiety would re-emerge.


Play Therapy


I have used play therapy with Wugs before to help him overcome feelings of loss when some family members flew back to Malaysia after a brief visit (Play Therapy for Families Living Apart).  I decided to do this again by building a copy of Wugs' preschool using Duplo bricks and adding stickers to the bricks for important details such as his coat peg and his name label.  Then I talked him through a typical drop-off at preschool, with us walking to the school, seeing his teacher at the door, finding his peg and name, putting his fruit in the basket, sitting with friends in the reading corner. We even built the toilets as another milestone for him has been trusting a teacher to help him use the toilet.  Familiarity and routine play a huge part in making Wugs feel secure and in control of his day. An unexpected outcome of this form of play was the way in which Wugs extended it.  He seemed especially interested in what Dooey and I would be doing whilst he was at preschool (so we built a separate scene that included our house, with me preparing the tea in the kitchen and Dooey having a nap).  He spoke about activities he did at preschool, the names of children and teachers that he interacted with and what looked like actions to songs he had learned there (things that he does not readily talk about when I collect him at the end of the session).

Other Ideas/Suggestions to Help Settle a Child at School (from a non-professional)

Sit in on a Couple of Sessions - At least initially I would recommend attending some of the sessions, even if the child isn't visibly distressed about you leaving.  This gives the parent a feel for what the child will be experiencing during his day, the types of children he will be playing with, the way the teachers handle specific issues as well as the general impact of the preschool schedule on the child.  I found it beneficial to observe the children, especially those that were initially distressed when their parents said "goodbye" and eventually settled into an activity.  Other children happily kissed their parent goodbye and then got upset at some point during the afternoon.  In Wugs' preschool the teachers handled that by getting the child to draw a picture for the parent they were missing.  This sort of observation helped me to trust the teachers that would look after Wugs and that feeling of trust (I believe) was sensed by Wugs which enabled him to trust them too.

A Keepsake - Just as The Kissing Hand is about carrying a mother's kiss wherever the child goes, the preschool teachers have recommended giving the child a keepsake of some sort to carry around with him at school.  (Something inexpensive in case it gets lost - a small paper heart, for instance).  The child may pull out the keepsake and feel a sense of proximity to the parent through it.  One of my favourite tips was to rub a little perfume on your child's clothing so that he can feel close to you through a familiar scent.  

Telling the Child What You Are Doing Whilst He/She is at Preschool - This suggestion came from an experienced preschool teacher who said that children often feel that when the parent leaves, he/she has disappeared for good.  It helps the child settle if he knows you are doing a particular activity whilst he is at preschool that has a beginning and an end (going to the shops, preparing the dinner, posting a letter etc).  I tried this a couple of times, but for me the challenge was finding something that Wugs wouldn't want to do as well.  He loves working alongside me, going to the supermarket etc.

Accepting All Emotions -  I've often heard people say "Don't cry" and then "Well done for not crying" to Wugs in a heart-warming way and with the best of intentions, but telling a child to bottle up their emotions is not only counteractive (because it is through expressing them and talking about them that the physical behaviour is resolved), but threatens the relationship of unconditional love that a child believes he has with his parent.  Even though I've often wanted Wugs not to cry in order to make my job of leaving him easier, it is unfair to expect him to control his emotions in order to save mine.  He is looking to me for emotional stability, to be able to accept his emotions and reassure him.

Using Neutral Language - I started referring to preschool as "big school" where Wugs goes because he is a "big boy", playing on the fact that Wugs often feels proud to be the older brother (whereas Dooey is still little and stays at home with mum).  What I didn't appreciate was that Wugs was feeling two conflicting emotions - one was a sense of responsibility for his brother, (he was worried about where Dooey was and what he was doing when Wugs was at preschool) and the other was a feeling of wanting to draw back (I suspect he was experiencing preschool as some kind of punishment for growing up) and  was regressing fast (lying across my chest with his milk in his hand wanting to be like a baby).  Again, I found it helpful to accept the way he was feeling and let him work through it in his own time.

Making Time Before and After the Preschool Session - Wugs attends afternoon preschool sessions, so I keep the morning activities light so that he is not too tired when he goes (some of his initial unhappiness in attending preschool I believe was due to tiredness - usually he would nap in the afternoon).  Although I have sometimes struggled to do this, I found it helpful to prepare the evening meal whilst he was at preschool so that I was available to him when he came out, rather than scurrying off into the kitchen to cook dinner as soon as he was home.  

I'm pleased to say that after completing his first day in his new term last week, no tears were shed and Wugs was actually excited to go - something that was unimaginable even a month ago.


Sunday, 19 April 2015

A Peace Corner - To Encourage Children to Talk About Feelings


Negative feelings are a difficult thing to manage with young children, especially with those who are unable to verbalise or rationalise them yet.  Over recent months we've witnessed heightened emotions spread like fire through the house, leaving us all exhausted and frazzled by the end of the day.  Our family has been through a period of change these last few months - an international move, residing at a number of addresses before choosing our temporary home, introducing my eldest son to preschool, getting used to the cold weather, layers of clothing, stairs, people who speak English with a different accent and family members who visit on a regular basis.  It has been a turbulent time for the children and has given rise to some negative emotions and inappropriate behaviour.

I wanted to encourage the children to recognise their emotions, talk about them (before acting on them) and recognise those feelings in others.  I decided to create a "Peace Corner" - (ambitious, I know!) an area in the children's bedroom that a child can retreat to when he needs to calm down or restore some inner equilibrium.


What we used:

A Sheepskin Rug - I wanted to create a place of comfort and warmth so the "Peace Corner" was built around a sheepskin rug

A Hideaway - it is sometimes difficult to be alone when you have another sibling with whom you share a room, so I created a hideaway using saree cloth

A Mirror - to identify facial expressions associated with certain emotions

A Mood Light - to create a cosy atmosphere

Blank Faces - for the children to draw out their feelings

Calm Down Jars - a visual sensory item to encourage balance (I followed the first recipe from this website).

Stress Ball

Chewing Toys - my 23 month old uses chewing as a way to calm himself (we purchased these toys from here).

Lavender-scented Toy - this cuddly toy can be warmed up in the microwave and gives off a lavender scent.  He comes out when a child is upset to offer warm hugs.

Calm Down Cards - a collection of cards that inspire, comfort and remind us of God's love

Family Photos - a reminder of happy memories with the family

Music - my children enjoy classical and Eastern music which I play on the iPad and then sit the iPad on top of the wardrobe so that they can hear the music without getting distracted by the device.


Creating an environment that encourages calm and reflection is just a part of helping children manage overwhelming emotions.  It recognises the need for a change of scene, sometimes separation from others and an environment that positively acknowledges feelings.  In addition to our Peace Corner we went through some exercises which helped the children label their feelings, which I will post about in due course.

Thursday, 12 March 2015

Mother's Day Cards


It's Mother's Day this Sunday in the UK and it seems that every toddler, preschool and church group is full of activities that children can do to show their appreciation for their mothers.  I thought I would share a couple of simple ideas that I picked up along the way before sharing our own Mother's Day Card which Wugs and Dooey will give to my mother this weekend.

The Gift Card
The teapot card was made by Wugs at preschool this week.  It appears to have been made from pre-cut shapes (of decorative paper) that he had to stick together to create the teapot shape.  The little message and the attached teabag inside the card is a nice effect.  An inexpensive card that could be put together quickly using pages from magazines or wrapping paper.


The "MUM" Banner Card
This adorable banner card was decorated by my 22 month old Dooey.  I discovered this idea at a toddler craft lunch.  The card was cut from (what looks like) a folder (it is longer than A4).  This occupied Dooey for ages,  He decorated it with felt-tip pens, stickers and Do-A-Dot stampers.


The Flower Card
This card was of our own inspiration after a walk around some gardens last week with my mum. The card is made from tissue paper and paint.  I've written a detailed post about how we made it here.


Flower Cards


We made these flower cards for Mother's Day, but as they are for my mum, they could equally be used for Grandparent's Day (or any other occasion really).  Grandparent's Day is on 13th September this year (2015).


Last week we took a walk to some beautiful gardens and had the pleasure of seeing some flowers that had come into bloom - camellias, daffodils and a whole bank full of purple crocuses.   That trip provided the inspiration for our flower cards.

What we used:
Coloured card
Green paint
A small box (small enough for the child to get his fingers around)
String
Coloured tissue paper
Glue sticks

We started this activity by making the grass.  I wrapped string tightly around an old cream cheese box and asked the children to dab the bottom of the box into the green paint (until each section of string was covered with the paint).  Then I asked them to press the box against the card creating this grass effect. Our first attempt at this was better as I provided Wugs with just a small amount of paint.  Our second attempt with Dooey was a little smudged as the paint was too watery.


Once the paint had dried, we made our flowers by tearing up pieces of tissue paper and then screwing up the individual pieces into balls to make flowers.  Dooey does this naturally with all kinds of paper, so I knew he would enjoy this part!  Then I handed them each a glue stick and they stuck the tissue paper balls to the cards to create flowers.

These flower cards could also be made from pages of a children's magazine or any paper that is thin enough to screw up into a small ball.


Thursday, 5 March 2015

Name Road Mats for Car Enthusiasts


Over the last couple of weeks, Wugs and Dooey have been enjoying these name road mats. Wugs has been doing some name recognition activities at his preschool, so I thought that combining his interest in cars with the letters of his name would be a fun way for him to remember it.

(My apologies for not displaying the mats in full on the blog - I like to keep the names of my sons private.  Hopefully the idea can still be shared through the photos I have taken).


What we used:
Two sheets of A2 white paper
Coloured black pencil
White sticker labels (white markers on the road)
Light and dark green foam paper (fields)
Black foam paper (concrete land)
White foam paper (railway tracks)
Black marker pen (railway tracks)
Blue perspex (lakes)
Contact paper
Wooden painted blocks (shops and trees)
Glue
Cars and trains


The mats were a bit of an experiment and whilst working on them, I wasn't sure if I wanted the landmarks to be permanent features or not and whether I would draw them on or cut out the shapes from different materials.  I'm not great at drawing, so I decided to make some of the features permanent (green areas, concrete areas, lakes and train tracks) and some of them changeable (the wooden block buildings, trees and sign posts).

I drew the letters on the paper and coloured them in black/grey and added the white labels as the road markings.  Then I covered each sheet with contact paper.  I built up the landmarks around the letters using a very strong glue to stick the features to the contact paper. (As each name has different letters, the boys had their own unique road mats with similar features - each had a lake, green space, a concreted area and a railway track running through it).

The making of the mats was not that easy for a few reasons (and hopefully by mentioning this, I can make the process smoother for anyone else who wishes to make one):  Firstly, I decided to colour the letters by using coloured pencil.  The contrast of black and white can be a bit garish, so I was going for a softer look.  Clearly it has been years since I have coloured using a coloured pencil as I hadn't anticipated that the black/grey from the pencil would smudge over the white parts of the mat and that the colouring process would take so long! In the end, I cut out the letters and stuck them to a new sheet of paper.  I would recommend drawing the letters on to paper that is already coloured grey/black.  Secondly, I had to cover the paper with contact paper (double-sided sticky tape) if the mats were going to survive at the hands of my toddler.  This led to a bit of a fight with the contact paper... but we got there in the end!  In my experience, there isn't a perfect way to cover paper using contact paper.  Hopefully it isn't necessary to use it (unless you have a child who eats everything of course...which I do!)

Monday, 23 February 2015

"Snow and Ice" Salt Paintings


The recent bout of snowy and icy weather we have been experiencing lately has been fascinating for the boys as they experience their first ever winter in the UK.  I thought it would be great to capture the different textures and colours of the season through some artwork using a technique called salt painting.

Ideally a salt painting is made by sprinkling salt onto a watercolour painting whilst the painting is still wet.  The water from the paint absorbs the salt and sticks it to the painting.  (In our case, I misread the watercolour paint chart and accidentally purchased white watercolour paint instead of  blue!) I improvised by watering down regular blue Crayola paint which seemed to work just as well.

I set out the watercolour paper on the table and let the boys paint for a couple of minutes.  Whilst their paintings were still wet, I presented them with two small bottles: one containing fine salt and the other containing coarse salt.  After sprinkling salt on his picture, Dooey was pretty much done.  Wugs wanted to continue, so I brought out the white watercolour paint (that I accidentally purchased) and he happily painted away talking about "snow" and "wind" as he did it.  Later both boys added a sprinkle of glitter which created a nice effect.  


What we used:
Watercolour Paper
Blue Crayola Paint (watered down) (Blue watercolour paint may have been better)
White watercolour paint
Fine and coarse salt
Silver glitter

Thursday, 19 February 2015

Chinese New Year Lion Sock Puppets


A couple of weeks ago I had the idea to create some sock puppets for the boys for Chinese New Year. As with most of my ideas that involve sewing, I design the project and pass it into the capable hands of my mum.  These adorable lions were based on the fluffy lion costume that is worn by dancers who act out the lion dance – a dance that is performed throughout Singapore and Malaysia at this time of year. We have been playing with them alongside reading this book about the lion dance.  You can read a review of this book from my post on South-East Asian Children's Picture Books:


I drew out the shapes on an A4 sheet of paper and used the shapes as templates for the different features of the lion.  The top three images are the parts of the eyes, the fourth image is the teeth and tongue and the fifth image is the ears.  For the ears, I doubled over the felt to make them stronger so they would stand up.  The nose was a yellow pom pom securely sewn on.  We had a few limitations in putting the sock puppets together as Dooey puts everything in his mouth (so googly eyes, glue or small parts of any kind couldn’t be used). 


All the felt pieces were sewn onto the sock and then strips of the yellow fluffy material were sewn around the edges of the eyes, ears and upper part of the mouth.  The material was very fluffy so I trimmed it down so it different overwhelm the lion's other facial features.  We also added 3 strips of braid that hung down under the mouth of the lions for a mane.  (In the lion dance costume, the mane is very subtle and strands of wool may have been closer to the original design.  We didn't use wool as they could easily become tangled in the hands of my young boys). 

What we used:
A pair of red socks
Black, white, red, orange and green felt
Yellow fluffy material (bought from Hobbycraft, 1 metre for two socks was just enough)
Different-coloured cotton (to match the colours of the felt)
Yellow pom pom
Golden braid


Tuesday, 10 February 2015

Frozen Small World Play


Inspired by the freezing cold temperatures last week and constrained by the fact that I had two little boys who were very unwell, we decided to explore the snow indoors through a Frozen-themed small world play.

Most of the small worlds I have created in the past have focused on exploring different sensory materials through touch, but this one also incorporates a visual element - of light shining through coloured tiles.  Magna-Tiles are a brilliant educational toy that come in a variety of shapes and sizes and are made of coloured plastic with little magnets around the edges.  This means they can be joined together to make 3D constructions. When Wugs first opened his box of Magna-Tiles, he pulled out the blue-coloured ones and said he wanted to build an "Elsa castle", so the idea for the Elsa castle in this small world play comes from him.


What we used:
A light table (see here how you can make your own)
Magna-Tiles
Disney Frozen figurines
Blue perspex (to line the bottom of the tub to make a frozen lake)
Scoops and small containers

To make the snow dough:
6 cups of cornflour/starch
3 cups of vegetable oil
Aqua and silver glitter
Aqua foil snowflakes

I made the snow dough by slowly adding the vegetable oil to the cornflour in stages and mixing it up until the flour clumps, but can break away easily.  If the oil is added too quickly, it becomes gloopy. The texture of the snow dough is soft and velvety.


Wednesday, 4 February 2015

"Frozen" Bubble Dough Play - Only Two Ingredients!


We decided to experiment with a different type of playdough today.  I've seen various recipes for "bubble dough" or "ice cream dough"(as it's sometimes called) on the web.  The dough is made from essentially two ingredients: cornflour/starch and a washing product (such as washing-up liquid or conditioner or bubble bath).  As we had some cheap handwash lying around, I decided to make ours using this.


I poured a small packet of cornflour into a bowl and then gradually added the hand wash kneading the dough and handwash together for a few minutes until I got a texture I was happy with.  (The quantity of corn flour and hand wash I've given below may vary according to the type of cornflour and handwash you use).  The playdough was extremely soft and colder than normal playdough.  It was tougher to break in two, but broke cleanly and also crumbled when rubbed between the fingers. It smelled divine!


What we used: 
A small packet of corn flour/starch
A third of a bottle of hand wash
Aqua glitter
Aqua and silver foil snowflakes
Disney Frozen figurines
Cake sticks

Originally, I hadn't intended to incorporate a "Frozen" theme, but when I combined the cornflour with the blue handwash, it blended to an aqua colour.  As I had glitter and foil snowflakes of a similar colour, I added these.  I gave the boys some cake sticks and their "Frozen" figurines and left them to play.


Wednesday, 21 January 2015

Arctic Small World Play


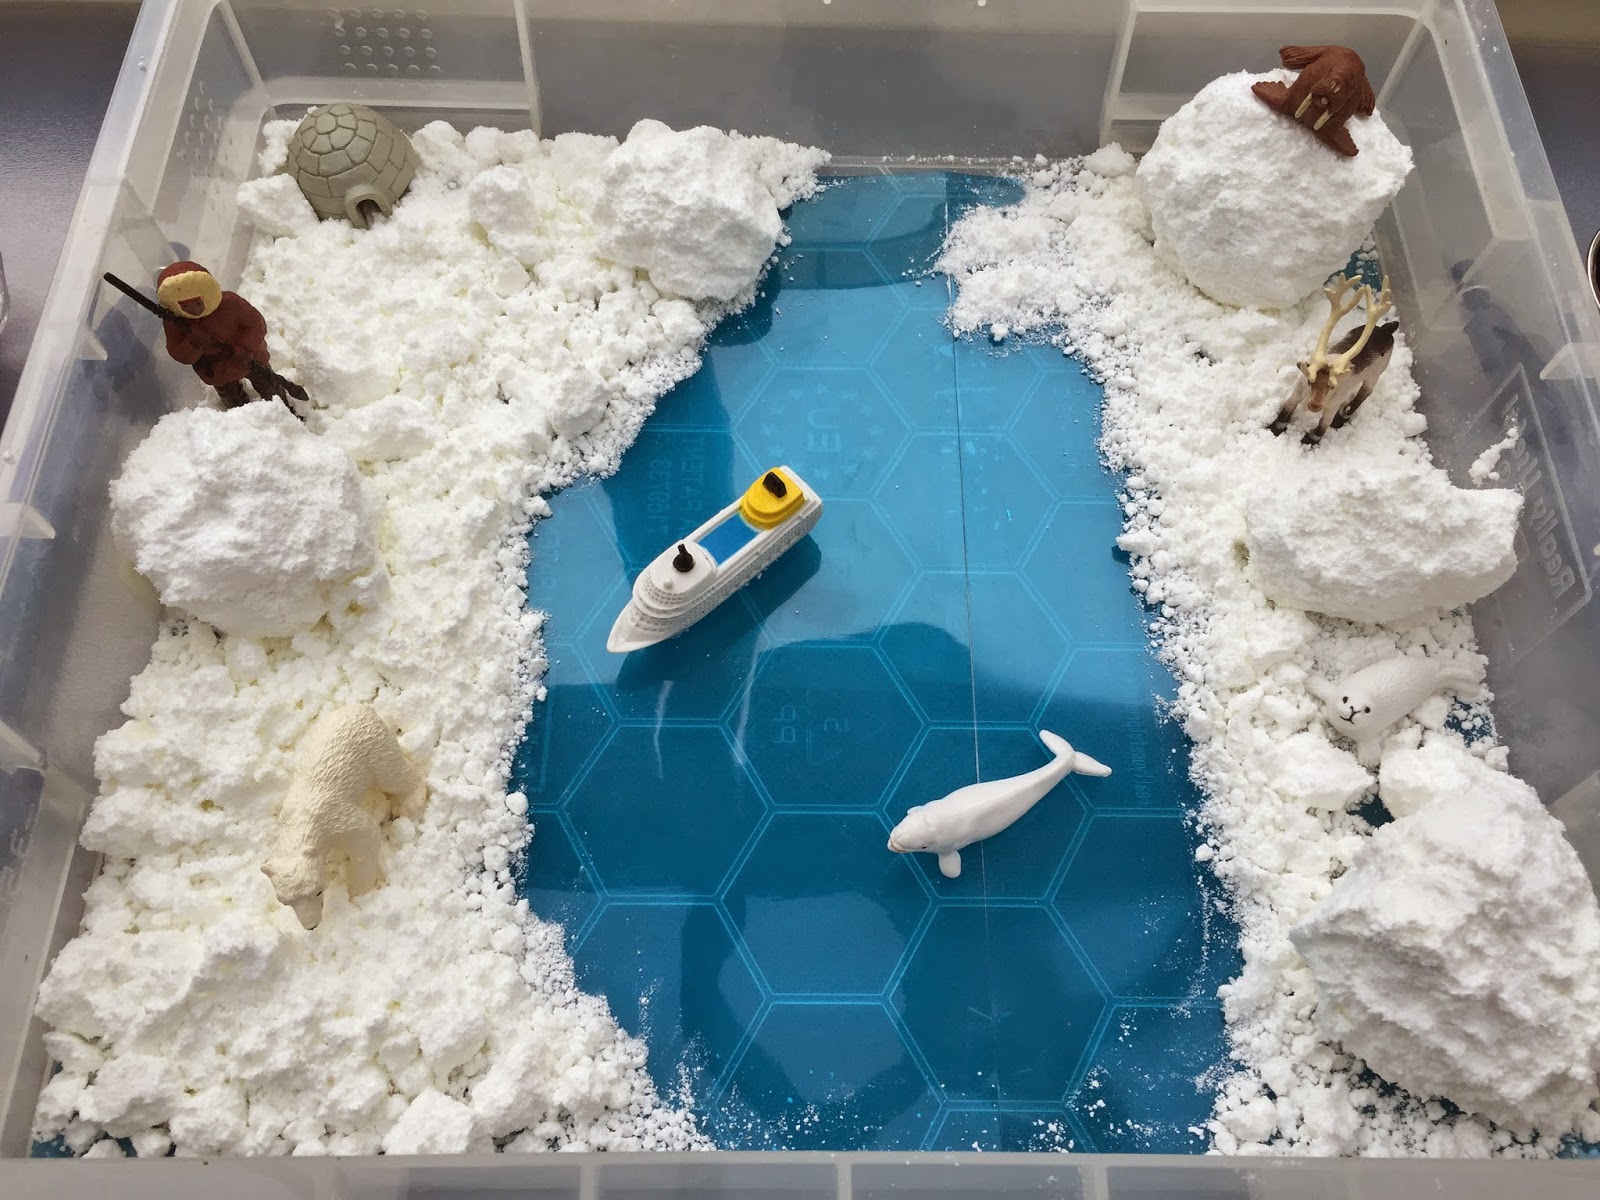
Our arctic small world play was inspired by a topic that Wugs' preschool is covering this week on the earth's polar regions.

To give Wugs and Dooey a different sensory material to play with (we have previously made "snow" from cornflour and oil), I decided to try a combination of baking soda and shaving cream.  When mixed together they create a rough powder-like texture that can be pressed together to make larger chunks or rolled into a large hard ball.  It was an interesting material to explore as the larger chunks (when chipped away at) would suddenly disintegrate.  For that reason, it was also a messy material to play with that left a thin sheen of white powder on everything in that area of their playroom! 


I added some blue perspex to the bottom of the tub to create a sea and added some figurines.  Dooey was particularly interested in the animals, so he learned a few new words.  Wugs was preoccupied with layering the snow on his helicopter and cars which he then wanted to wash off (yesterday he watched me de-ice our car which was covered in a thick layer of frost, so I expect that is why he played with it in this way).  The idea of frost and snow is still largely a novelty to the boys.  They haven't yet experienced real snow!

After they played we watched a short clip of the Arctic Ocean by the National Geographic which featured some of the animals we played with.  


What we used:
Large tub
Blue perspex
3 pots of baking soda (600g)
200ml of shaving cream
Figurines (we used the arctic Safari Ltd Toob)
Spoons, funnels and small containers